What is Datadog?
Datadog is the essential monitoring and security platform for cloud applications. They bring together end-to-end traces, metrics, and logs to make your applications, infrastructure, and third-party services entirely observable. These capabilities help businesses secure their systems, avoid downtime, and ensure customers are getting the best user experience.
TL;DR? Basically a tool that can monitor services such as servers, databases and tools. You can categorise your events to `Emergency`, `Error`, `Warn`, `Info` and monitor them closely.
Why use Datadog?
Say you have a platform with many features, tools and users. Using Datadog, you can put loggers (`Emergency`, `Error`, `Warn`, `Info`) on your codebase so when something goes wrong, the logger will send the event(s) to Datadog. On Datadog, you can filter based on various things (service name, logger type, url, etc) and on each log, you can zoom in to learn more about the origin and other useful log infos. This can save you and your team a lot of time when you need to find and fix errors.
TL;DR? When sh*t goes wrong (this kind of tool like an insurance right? we mostly care when things go wrong) they can help you finding the wrongs and where they are originated. It saves time for as long as you log properly.
In this blogpost, I want to share step by step how I created the Datadog Vue plugin. I hope this will help other developers 😀
01. Project setup
This step is on: repo [branch: feat/01-setup]
Create a basic package.json (commit 70429097556a82f29aaefe1d6f24ec092bf23087)
        {
        "name": "datadog-vue", // name of the package
        "version": "1.0.0", // package version
        "description": "Datadog Vue plugin", // package description
        "main": "index.js", // the main file, aka the brain of this package
        "author": "Ivana Setiawan", // your name
        "license": "MIT", // licensing. Learn more
        }
The package.json above is pretty empty. It doesn't do much. My personal preference is to at least add Babel and Eslint:
Install Babel
(commit 9bd05f70152172c69fc9d30f67e8ab5fbe555e3f)
Babel is a a toolchain that will compile your JavaScript application code that uses ES2015+ syntax into code that works in current browsers or environments.
        // Run on your Shell
        npm install --save-dev @babel/core @babel/cli @babel/preset-env
Create a config file named `babel.config.json` (requires v7.8.0 and above) in the root of your project with this content:
        // You can adapt the config below for the browsers you want to support.
        // See here for more @babel/preset-env options.
        module.exports = {
            presets: [
                '@vue/cli-plugin-babel/preset'
            ]
        }
Install Eslint
(commit ddbc3a83aca7c2982b4652fd25149da731f369a3)
Eslint is a static code analysis tool for identifying problematic patterns found in JavaScript code.
npm install --save-dev eslint eslint-plugin-vue

// Optional, you can also create .eslintrc.js in the root of your project
npm init @eslint/config
On `.eslintrc.js` (in the root of your project):
// You can adapt the rules in the config below</span>
module.exports = {
    extends: [
        'plugin:vue/recommended'
    ],
    rules: {
        // override/add rules settings here, such as:
        // 'vue/no-unused-vars': 'error'
    }
}
Is everything going well? check your `package.json`, it should looks like this:
{
    "name": "datadog-vue",
    "version": "1.0.0",
    "description": "Datadog Vue plugin",
    "main": "index.js",
    "author": "Ivana Setiawan",
    "license": "MIT",
    "devDependencies": {
        "@babel/cli": "^7.17.6",
        "@babel/core": "^7.17.5",
        "@babel/preset-env": "^7.16.11",
        "eslint": "^8.11.0",
        "eslint-plugin-vue": "^8.5.0"
    }
}
You should also see a package-lock.json and a folder called node_modules in the root of your project. (commit b3e737ae92862440afe9752fe87662f35da03682)
02. Datadog integration
This step is on: repo [branch: feat/02-integration]
Before I start writing code, it helps me tremendously to visualise what would be the best developer experience for my plugin. In my head, I want the flow to work like:
- To install, run
npm install datadog-vue - Dev should be able to pass client token (Client tokens are used to send events and logs from your user’s web and mobile applications.) and service name to easily filter the team logs
Let's get into it!
Install `@datadog/browser-logs` and start building the plugin.
npm i @datadog/browser-logs
When this is done, you should see this under dependencies on your `package.json`
// File: package.json
"dependencies": {
    "@datadog/browser-logs": "^4.6.1"
}
This step is on: repo [branch: feat/02-integration]
As mentioned above, there are two options that we want to pass for the Datadog plugin:
    // Client Token from Datadog
    clientToken: process.env.CLIENT_TOKEN,
    // Service name (tip: use your project or team name)
    service: process.env.SERVICE,
It will look something like above code, but don't worry about it now - we will use it later 👍🏽
Let's start making the plugin, on `index.js`:
(commit 8e437d3fab67d5eca351b1e89f70a57f9f1ef98a)
import { datadogLogs } from '@datadog/browser-logs';

export default {
    install(Vue, options) {
        /**
        * Rules:
        * - Enable in client only
        * - Not disabled
        */
        const isNotExecutable = !process.browser || options.disabled;
        if (isNotExecutable) return;

        /**
        * Check before executing the plugin:
        * - Client token must exist and not empty
        * - Service name must exist and not empty
        * Show warning (loggingWarn) if the condition is not met.
        */
        const initialCheck =
            (!options.clientToken || options.clientToken.length === 0) &&
            (!options.service || options.service.length === 0);
        const loggingWarn = () => {
            console.warn(
                'You are not using Datadog vue plugin. If you want to, you can enter a Datadog client token'
            );
            return;
        };
        initialCheck ? loggingWarn() : null;
    }
}
Let's initialise Datadog! For more info, check out Datadog log collection.
(commit ab145f29e610d7107ae5718a868ab1d570ac1291)
/**
* Initialising datadogLogs!
* See the params (https://docs.datadoghq.com/logs/log_collection/javascript/#initialization-parameters)
* Required: clientToken & site
*/
datadogLogs
? datadogLogs.init({
        clientToken: options.clientToken, // REQUIRED
        site: 'datadoghq.eu', // REQUIRED
        forwardErrorsToLogs: true,
        sampleRate: 100,
        service: options.service,
        env: process.env.NODE_ENV,
})
: null;

/**
* Add a context to all your loggers
* See addLoggerGlobalContext (https://docs.datadoghq.com/logs/log_collection/javascript/#global-context)
*/
datadogLogs.addLoggerGlobalContext('Site', options.service);
After the initialisation, we want create a simple log function to enable developers to log any of their events to Datadog.
(commit 15bc28808d487b1116f8bf654902574f6eba1ebd)
* Log functionality to Datadog
* @param  {String} message The message of your log that is fully indexed by Datadog.
* @param  {Object} messageContext A valid JSON object, which includes all attributes attached to the <MESSAGE>
* @param {String} status The status of your log; accepted status values are `debug`, `info`, `warn`, or `error`.
*/
</span>
$log: function (
    message = 'No message',
    messageContext = { function: 'noMessageContext' },
    status = 'error'
) {
    datadogLogs.logger.log(
        message,
        {
            context: {
                stack_trace: new Error().stack,
                ...messageContext,
            },
        },
        status
    );
},
So far so good! but how do we know it works?
Let's create a playground folder to test this plugin 😉
03. Playground
This step is on: repo [branch: feat/03-playground]
Create a Vue CLI project as a plaground (commit )
Creating a Vue CLI project is easy!
        // Install Vue CLI if you haven't
        // learn more here
        npm install -g @vue/cli

        // Create a new project
        // learn more here
        vue create playground
My Vue CLI preset is Default ([Vue 2] babel, eslint)
When the setup is done, make sure everything works:
        cd playground
        npm run serve
        // Go to http://localhost:8080/ (check your terminal for the right port)
        // You should see the app is running
Script
Wouldn't it be nice if a developer could go to the root of this repo then run
npm
    run playground
and see the playground in action? I think that would be a great developer experience 😉
Let's add a new script on our package.json in the root of our project.
(commit 6a1211e525d409cf8a6e4e751a65bb2ce6b5a2da)
        // package.json
        "scripts": {
        "playground": "npm link && cd playground && npm i && npm link datadog-vue && npm run serve",
        },
See it in action! type npm
run playground on the root of your project and go to http://localhost:8080/
Helper: What is npm link?
Use the plugin on the Playground
Go to playground/src/components/HelloWorld.vue and put some buttons that send events to Datadog using our datadog-vue plugin.
<template>
<div class="hello">
<h1>Some buttons</h1>
<button @click="handleClick('info', { function: 'triggerInfo' }, 'info')">
Click me for Info!
</button>
<button @click="handleClick('warn', { function: 'triggerWarn' }, 'warn')">
Click me for Warn!
</button>
<button @click="handleClick('error', { function: 'triggerError' }, 'error')">
Click me for Error!
</button>
<button @click="handleClick('debug', { function: 'triggerDebug' }, 'debug')">
Click me for Debug!
</button>
</div>
</template>
<script>
import Vue from "vue";
import ddLog from "datadog-vue";
new Vue.use(ddLog, {
clientToken: "1342889190",
service: "venopi",
});
export default {
name: "HelloWorld",
props: {
msg: String,
},
methods: {
handleClick(message, messageContext, status) {
ddLog.$log(message, messageContext, status);
},
},
};
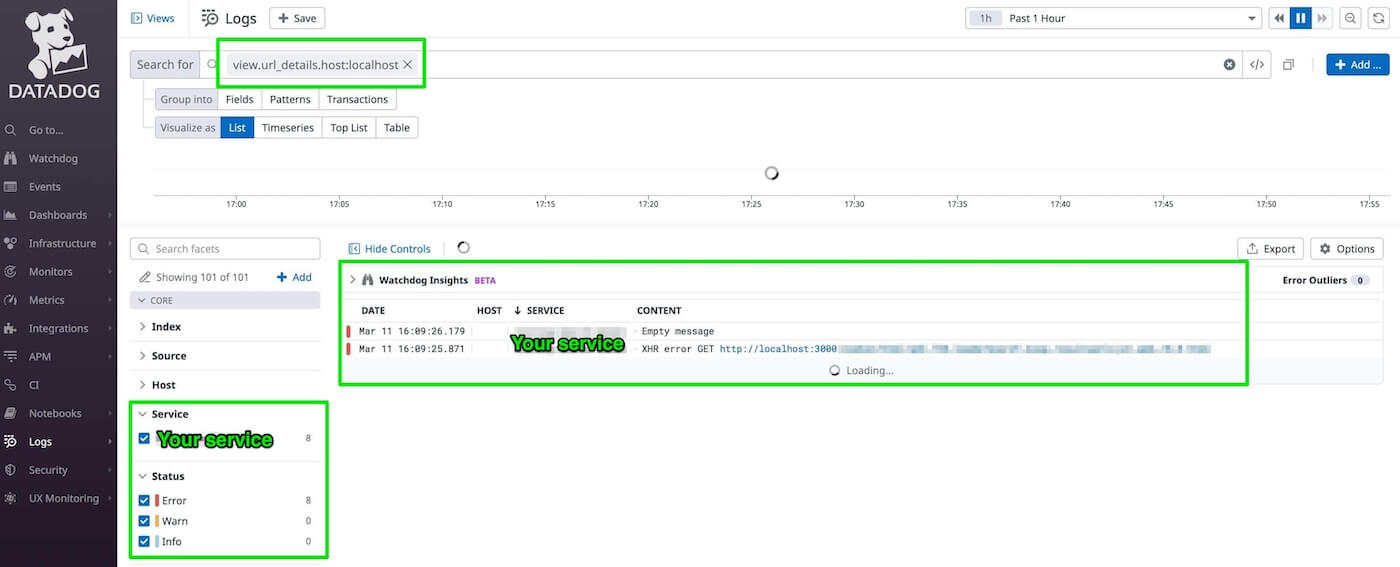
</script>How do I know if it works?
After you click some buttons on the demo, Go to your Datadog logs app and filter based on `localhost` and you should see the logs appearing!
04. Bonus
This step is on: repo [branch: feat/04-bonus]
Since there are many types of logs, we want developers who are using our plugin to be able to log specifically the type of log they want to send. As for now, you need to call $log and specify the type => ddLog.$log(message,
messageContext, status);
And we want something like:
        ddLog.$info(...) // Send info
        ddLog.$debug(...) // Send debug
        ddLog.$warn(...) // Send warn
        ddLog.$error(...) // Send error
But, before we start, since we're building client side's plugin, I want to make it clear by adding `.client` on our `index.js` file. (commit 0c63393b5844036b6d778ada0f0a6603cb36aefa)
Let's continue with our plugin!
Update the `index.client.js` to have info, debug, warn and error:
/**
* Log the message with "error" flag to Datadog
* @param  {String} message The message of your log that is fully indexed by Datadog.
* @param  {Object} messageContext A valid JSON object, which includes all attributes attached to the <MESSAGE>
*/
$error: function (
    message = "Empty message",
    messageContext = { function: "messageContextMissing" }
) {
    datadogLogs.logger.log(
        message,
        {
            context: {
                stack_trace: new Error().stack,
                ...messageContext,
            },
        },
        "error"
    );
},

/**
* Log the message with "warning" flag to Datadog
* @param  {String} message The message of your log that is fully indexed by Datadog.
* @param  {Object} messageContext A valid JSON object, which includes all attributes attached to the <MESSAGE>
*/
$warn: function (
    message = "Empty message",
    messageContext = { function: "messageContextMissing" }
) {
    datadogLogs.logger.log(
        message,
        {
            context: {
                stack_trace: new Error().stack,
                ...messageContext,
            },
        },
        "warn"
    );
},
/**
* Log the message with "info" status to Datadog
* @param  {String} message The message of your log that is fully indexed by Datadog.
* @param  {Object} messageContext A valid JSON object, which includes all attributes attached to the <MESSAGE>
*/
$info: function (
    message = "Empty message",
    messageContext = { function: "messageContextMissing" }
) {
datadogLogs.logger.log(
    message,
    {
        context: {
            stack_trace: new Error().stack,
            ...messageContext,
        },
    },
    "info"
);
},
/**
* Log the message with "debug" status to Datadog
* @param  {String} message The message of your log that is fully indexed by Datadog.
* @param  {Object} messageContext A valid JSON object, which includes all attributes attached to the <MESSAGE>
*/
$debug: function (
    message = "Empty message",
    messageContext = { function: "messageContextMissing" }
) {
datadogLogs.logger.log(
    message,
    {
        context: {
            stack_trace: new Error().stack,
            ...messageContext,
        },
    },
    "debug"
);
},
Awesome! now we can do something like:
ddLog.$info(message, messageContext); // When we want to send info
ddLog.$debug(message, messageContext); // When we want to send debug
ddLog.$warn(message, messageContext); // When we want to send warn
ddLog.$error(message, messageContext); // When we want to send error
Any questions or suggestions? write to me.
I love learning new things and enjoy getting to know people!
Helpers: